Your home's air filter is a silent hero, trapping air pollution and keeping your heat and air conditioning running efficiently. But when was the last time you changed it?
A clogged filter can lead to below-par air quality and higher energy bills. The filter packaging's minimum efficiency reporting value (MERV) rating indicates how effectively it captures particles.
In this article, we'll guide you through the simple process of changing your furnace filter and help you recognize when it needs replacing.
Does Your Central Air Unit Have a Furnace?
Before changing your furnace filter, you must determine if your central air unit even has a furnace. Many modern homes rely on a central air system for heating and cooling, including a furnace for filtration. The furnace filter plays an important role in maintaining indoor air quality by trapping allergens, dust, and other airborne particles. If you're unsure whether your system has a furnace filter, there are quick ways to find out so you can ensure your home's air remains as pure as possible.
How to Quickly Tell if You Have a Furnace Filter
To swiftly determine if your central air unit has a furnace filter, first locate the furnace itself, typically in the basement, attic, or utility closet. Look for a slot or compartment near the bottom of the furnace. It may contain a disposable filter designed to trap allergens, particulates, and other debris before circulating through your home.
If you see a humidifier connected to your HVAC system, chances are you also have a furnace filter. These devices typically work together to keep indoor air quality and moisture at appropriate levels. To confirm whether you have a filter and find its location, check for a filter compartment on the furnace or refer to your system's brand and model information.
How to Properly Change a Furnace Filter
When it's time to replace your furnace filter, the process is straightforward but requires attention to detail. Changing your filter regularly helps maintain optimal air quality by trapping pollen, dust, and other allergens before they circulate through your air handler. Remember that filter prices vary, so shop around for the best deal.
Follow these steps to efficiently change your furnace filter and keep your home's air clean and fresh.
Step 1: Turn Off the Furnace
Before changing your furnace filter, switch off your HVAC system completely to prevent fiberglass particles from circulating through your ductwork and to stop airflow while you work. Locate the exact switch or circuit breaker that powers your furnace and turn it to the "off" position. Failing to turn off your system before changing the filter can allow dust, mold spores, and other allergens to bypass the filter and contaminate your air, so this step is crucial. Wait for the furnace to cool down fully before proceeding to the next step.
Step 2: Open and Label New Filters
Before inserting your new furnace filter, remove it from the packaging and inspect it for damage or defects. If you or a family member suffers from asthma or allergies, consider upgrading to a high-efficiency filter designed to trap smaller particles like smoke, bacteria, and allergens.
Use a marker to write the date on the filter frame to track when it needs replacing. This step will help you maintain a regular replacement schedule and ensure optimal air quality in your home:
- Remove the new filter from the packaging and inspect for damage
- Upgrade to high-efficiency filter if needed for asthma or allergies
- Label filter frame with installation date using a permanent marker
- Maintain regular replacement schedule for optimal air quality
Step 3: Locate the Furnace Box and Door Panel for the Filter
To locate your furnace box, head to the basement, utility closet, or attic where your HVAC system is installed. Look for a metal cabinet housing the furnace itself. The furnace may be connected to a dehumidifier or other air-quality components designed to remove excess moisture, odors, and other pollutants.
Once you've found the furnace box, search for the door panel that accesses the filter compartment. It is usually located near the bottom of the unit. It may be labeled with words like "filter," "return," or "air intake." Open the panel carefully to avoid disturbing dust, lint, or pet dander that may have accumulated inside.
Step 4: Remove the Old Furnace Filter

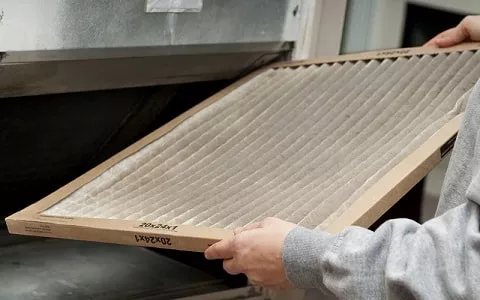
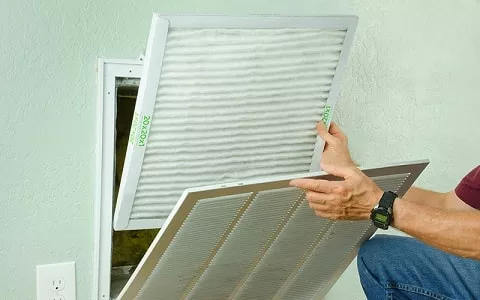
Removing the old filter is easy. If you are replacing it in a utility room (see photo above), you will see a vertical or horizontal slot where the home air filter slides into place. Slide it out. If you are replacing it through the ceiling (image to the right), you will need to unscrew the return air grille. It is likely hinged on one end, but be careful not to drop it on yourself. Just pull the filter down towards you to remove it. In our experience, these filters will typically be the monthly variety.
Dispose of the old filter immediately to avoid spreading allergens or dust back into your living space. During this home improvement task, consider keeping a small trash cart or bag near your furnace for quick and easy filter disposal.
Step 5: Install the New Furnace Filter
Slide your new, labeled furnace filter into the slot, ensuring the arrows on the frame point toward the airflow. Opting for a filter made in the USA can support domestic manufacturing while maintaining your HVAC system's energy efficiency and reducing your home's carbon footprint.
Once the filter is securely placed, close the furnace panel and turn your system back on at the circuit breaker or basement switch. For a quick view of your handiwork, shine a flashlight on the newly installed filter to confirm it's properly positioned and ready to trap dust, allergens, and debris.
Step 6: Turn the Furnace Back On
After installing your new furnace filter, head to the HVAC systems circuit breaker or switch. Flip the switch or breaker back to the "on" position to restore power to your furnace and air handler, taking care to protect your privacy in accordance with the manufacturer's privacy policy.
Listen for the unmistakable hum of your furnace as it kicks back on, signaling that your system is once again ready to circulate clean, filtered air throughout your home. Rest assured that by changing your filter regularly, you're taking a crucial step in maintaining your HVAC system's efficiency and protecting the air quality in your living space, a right reserved for all homeowners with some know-how and a credit card for purchasing filters.
Find Where Your Filter Is
You'll need to locate your furnace filter to keep your central air system running efficiently and maintain optimal indoor air quality. This crucial component is typically housed within the furnace, which is often found in your basement, utility closet, or attic.
Once you've located the furnace, look for a removable panel or slot near the bottom of the unit. This compartment should contain the filter, which is designed to trap dust, allergens, and other airborne particles before they can circulate through your home's air ducts.
If you're having trouble finding the filter, consult your furnace's user manual or look for labels on the unit itself that may indicate the filter's location. Some systems may have multiple filters, so check all possible locations.
Check the Filter Size
Before purchasing a new furnace filter, check the size of your current filter to ensure a perfect fit. Locate the dimensions printed on the side of your existing filter, typically listed in inches (length x width x depth).Common furnace filter sizes include:
- 16x20x1
- 16x25x1
- 20x20x1
- 14x20x1
- 14x25x1
If you can't find the size of your old filter, carefully measure the dimensions using a tape measure or ruler. Accurate measurements ensure your new filter fits snugly and effectively traps airborne particles.
When in doubt, consult your furnace's user manual or contact the manufacturer for help on the appropriate filter size for your specific model. Selecting the correct filter size will maintain optimal airflow and keep your central air system running efficiently.
Turn Off the Power to the HVAC System
Before changing your furnace filter, switch off the power to your entire HVAC system. Locate the dedicated circuit breaker or power switch that controls your heating and cooling unit, typically in your home's main electrical panel or near the furnace.
Flip the circuit breaker to the "off" position or turn off the power switch. This critical step prevents any electrical accidents and ensures the furnace fan won't kick on while replacing the filter. Double-check that the power is off by attempting to turn on your thermostat or listening for the absence of the furnace's hum. You can safely change the filter once you've confirmed that the HVAC system is powered down.
Working with your furnace while connected to a power source can be dangerous. Always prioritize your safety by turning off the power before beginning any HVAC maintenance tasks.
Remove the Old Filter(s)
As you remove the old filter, take note of its condition. If it's covered in dust, debris, and other particles, this is a clear sign that it's time for a replacement. A dirty filter can impede airflow, reduce your HVAC system's efficiency, and diminish indoor air quality.
Signs that indicate it's time to replace your furnace filter:
- The filter is visibly dirty, clogged, or discolored
- Increased dust accumulation on surfaces throughout your home
- Reduced airflow from vents or longer cooling/heating cycles
- Unexplained spikes in energy bills due to decreased HVAC efficiency
Dispose of the old filter promptly and properly to avoid reintroducing trapped contaminants into your living space. Consider placing the old filter in a sealed plastic bag before discarding it in your household trash to minimize the spread of dust and allergens.
Install the New Filter(s) in the Correct Direction
Once you've removed the old furnace filter, unwrap your new replacement filter and locate the airflow direction arrows printed on the frame. These arrows indicate the proper orientation for installing the filter, ensuring it effectively captures airborne particles as your HVAC system circulates air throughout your home.
Slide the new filter into the slot or compartment, ensuring the arrows point toward the furnace itself. This direction ensures that the air flows through the filter media before entering your HVAC system, maximizing its filtration capabilities.
Double-check that the filter fits snugly in the compartment, with no gaps or spaces around the edges. A properly fitted filter will prevent unfiltered air from bypassing the media and circulating throughout your living space, maintaining optimal indoor air quality.
If you encounter resistance while inserting the new filter, recheck the size and dimensions to ensure you've purchased the correct replacement. Installing a filter in the wrong direction or using an ill-fitting filter can negatively impact your HVAC system's performance and energy efficiency.
When to Replace Your Furnace Filter
Check the recommendation on your filter, but it will typically vary with a suggestion of either monthly or seasonally. Some systems work more efficiently with a filter that is replaced monthly, so you will want to stay on top of your changes in order to ensure top performance. Please give us your feedback about your experience putting this information into action. Changing the filter regularly will ensure the ducting and the diffusers, and other types of vents stay cleaner and operate more effectively.
Remember to save on all your replacement HVAC parts with us at PlumbersStock. If this how to change a furnace filter tutorial was helpful, please share it on social media!


