

- Gas supply tube
- Igniter or sensor
- Thermocouple
- Turn off the gas supply and the circuit breaker to the furnace
- Clean the pilot light orifice with a thin wire or compressed air
- Check the thermocouple for damage and replace if necessary
- Relight the pilot light and observe the flame color
- Weak or flickering flame
- Yellow or orange flame color
- Soot buildup around the pilot light assembly
- Clean the pilot light assembly and orifice with a thin wire or compressed air
- Check the thermocouple for damage and replace if necessary
- Ensure proper airflow around the furnace to prevent drafts from extinguishing the pilot light
- Consider replacing aging components to maintain a reliable and safe heating system
- Wait a few minutes for any residual gas to dissipate
- Consult your furnace's manual for specific relighting instructions
- Locate the pilot light assembly and thermocouple
- Follow the manufacturer's guidelines for relighting the pilot
- Locate the pilot light assembly and thermocouple
- Press and hold the reset button on the gas valve
- Light the pilot with a match or lighter
- Continue holding the reset button for thirty seconds after the pilot ignites
- Release the reset button and verify the pilot remains lit
- Turn off the gas supply immediately
- Consult your furnace's manual or contact a professional HVAC technician for assistance
- Avoid attempting to relight the pilot until the issue has been resolved
- Pilot light that won't stay lit
- Yellow or flickering pilot light flame
- Strange odors coming from the furnace
- Reduced heat output or uneven heating
- Increased energy bills without increase in usage
A pilot light is vital to your furnace, ensuring a steady heat supply during chilly days. However, when your pilot light goes out, it can lead to a lack of heat and even potential gas leaks, which can be dangerous. Checking your pilot light regularly is essential for maintaining a safe and comfortable home environment.
In this article, we'll guide you through checking your furnace's pilot light, identifying common issues, and safely relighting it if necessary.
Understanding the Role of the Pilot Light in Your Furnace
The pilot light is important to your furnace's operation. A small, continuous flame ignites the main burner when heat is needed. This flame is typically fueled by a small amount of gas and is designed to remain lit at all times. It ensures safe and efficient combustion, prevents potential gas leaks, and ensures proper water heating. As a homeowner, it's important to understand when and how to check your pilot light to maintain the integrity of your plumbing system and avoid potential hazards.
Identifying the Purpose of a Pilot Light
The pilot light serves as a small, constantly burning flame that lights up the main burner in the furnace when the thermostat signals a need for heat. This flame is usually located near the bottom of the furnace, close to the gas valve.
Without a functioning pilot light, your furnace won't be able to produce heat, leaving your home cold and uncomfortable. You can check its status by looking for the small flame through the small window or peephole on the furnace, often located near the gas valve or behind an access panel secured with a screw or switch.
Recognizing When It Should Be Checked
If your furnace fails to produce heat or you notice an unusual smell, it's time to check the pilot light. A malfunctioning thermocouple, a safety device that regulates the gas flow to the pilot light, can cause the pilot light to go out, affecting the ignition system and preventing the furnace from operating properly.
Regularly inspecting the pilot light, especially before the heating season begins, ensures that your furnace receives the necessary fuel and electricity to function efficiently. If you discover that the pilot light is out, follow the manufacturer's instructions to safely relight it or contact a professional if you're unsure about the process or encounter issues with the gas valve.
Precise Steps to Check Your Furnace's Pilot Light
Checking your furnace's pilot light is a straightforward process that ensures your heating system operates safely and efficiently.
Before attempting to relight the pilot light, it's crucial to locate the access panel, identify the pilot light assembly, and understand the color indications of a healthy flame.
Locating the Furnace's Access Panel
To check your furnace pilot lights, first locate the access panel on your furnace. This panel is typically located near the bottom of the unit and may be secured with screws or a latch. The panel provides access to the furnace's internal components, including the pilot light assembly and gas valve.
Once you've found the access panel, carefully remove it to expose the inner workings of the central heating system. Exercise caution when handling electrical components and ensure the power to the furnace is turned off before proceeding. With the panel removed, you can now locate the water heater pilot and prepare to inspect its condition.
Identifying the Pilot Light Assembly
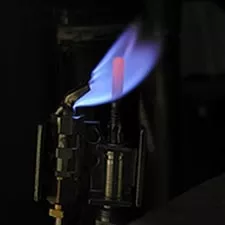
Once you've accessed the furnace's internal components, look for the pilot light assembly near the gas valve. The pilot light comprises a small brass fixture with a gas supply tube and an igniter or sensor. If you own a natural gas furnace, the pilot light assembly will be connected to the main gas line.
Identifying the pilot light is crucial for proper furnace repair and indoor air quality. The assembly may vary slightly depending on whether you have a traditional furnace or a heat pump system. Look for these key components:
Understanding the Color Indications of a Healthy Pilot Light
A healthy pilot light should emit a steady blue flame with a slight yellow tip. The blue color means that the gas is burning efficiently and completely. If you notice a primarily yellow or orange flame, it could signify that the pilot light is not receiving enough oxygen, leading to incomplete combustion and potential carbon monoxide buildup.
When troubleshooting pilot light issues, pay attention to the color of the flame. A weak or flickering flame may indicate a clogged pilot orifice or a damaged thermocouple. Inspect the pilot light assembly for any debris or corrosion on the metal components. Here are some steps to take if you notice an unhealthy pilot light color:
Common Reasons Why a Pilot Light Goes Out
A pilot light that frequently goes out can be frustrating, leading to inconsistent heating and wasted energy. Several factors can contribute to this problem, from simple drafts disrupting the flame to the gradual wear and tear of essential furnace components. Understanding these common causes will help you troubleshoot and address pilot light issues more effectively, ensuring your furnace operates at peak efficiency.
By identifying and resolving problems such as airflow disruptions, dirt accumulation on the pilot light, and the aging of critical parts, you can maintain a reliable and safe heating system that keeps your home comfortable without tapping into your energy budget or risking carbon monoxide leaks through your ductwork.
Drafts and Airflow Disruptions
Pay attention to any drafts or airflow disruptions near your furnace. Strong gusts of wind or air from nearby vents can blow out the pilot light, causing your heating system to shut down unexpectedly. Screen your furnace area from drafts by sealing any cracks or gaps around doors, windows, or other openings.
Ensure proper ventilation around your furnace to prevent airflow disruptions that can extinguish the pilot light. Keep the area around your furnace clear of clutter and debris, as these can obstruct airflow and cause a pilot light to go out. Additionally, avoid using a gas stove or other open-flame appliances near your furnace to minimize the risk of drafts and potential injury.
Dirt Accumulation on the Pilot Light
Debris and dirt can accumulate on the pilot light orifice, restricting gas flow and causing the flame to weaken or extinguish. This issue is particularly common in furnaces located in dusty basements or areas with poor air filtration. To maintain proper gas pressure, regularly inspect the color of your pilot light flame and clean the orifice with a thin wire or compressed air.
A dirty pilot light can also lead to incomplete combustion, producing carbon monoxide as a byproduct. Position a carbon monoxide detector near the furnace for alerts in case of dangerous gas buildup. Signs of a dirty pilot light include:
Aging of the Furnace Components
Critical components like the thermocouple and pilot light assembly can wear down as your furnace ages, leading to frequent pilot light outages. A worn-out thermocouple may fail to detect the pilot light flame, causing the gas valve to shut off and disrupt the gas flow to the pilot light. Regular maintenance and timely replacement of aging parts can help stop these problems and ensure proper ventilation.
Over time, the pilot light orifice can become clogged with debris or corroded, restricting gas flow and making it difficult for the pilot light to stay lit. If you notice your pilot light going out more often as your furnace ages, consider the following steps to address the issue:
How to Safely Relight the Pilot Light
If your furnace pilot light has gone out, following proper safety procedures is crucial when relighting it. Turn off the gas supply before trying to relight the pilot to prevent potential gas leaks or carbon monoxide buildup. Wait a few minutes for any residual gas fumes to dissipate, ensuring you don't accidentally ignite them with a lighter or spark. Once the area is clear, carefully follow the manufacturer's instructions to relight the pilot light, paying close attention to the placement of the copper thermocouple and the color of the flame.
Remember, if you're unsure about the process or encounter any issues, it's always best to contact a professional HVAC technician to avoid damaging your heating system or voiding your warranty coupon.
Turning Off the Gas Supply
Before attempting to relight your furnace's pilot light, prioritize your safety and the accessibility of your home's gas line. Locate the gas valve near your furnace and turn it to the "off" position using a flashlight for better visibility. Cutting off the gas supply prevents any potential leaks or accumulation of fumes while you work on relighting the pilot.
As part of this home improvement task, familiarize yourself with your furnace's privacy policy and request service procedures if you encounter any issues. Once the gas is turned off, take these steps to ensure a safe relighting process:
Locating the Pilot Light and Thermocouple
Armed with your flashlight, carefully inspect the furnace's interior to locate the pilot light assembly and thermocouple. The pilot light is typically near the bottom of the furnace, close to the gas valve. Look for a small brass fixture with a gas supply tube and an igniter or sensor. The thermocouple, a copper rod that detects the pilot light flame, should be positioned directly in the flame's path.
Identifying these key components is crucial for a successful pilot light relighting process. Remember that the exact appearance and location of the pilot light assembly may vary depending on your furnace model. If you have difficulty locating these parts or have accessibility concerns, consult your furnace's manual or request service from a professional HVAC technician for your heating system's safety and proper functioning.
Relighting the Pilot Light
Once you've located the pilot light assembly and thermocouple, follow the manufacturer's instructions to relight the pilot light. For most furnaces, this process involves holding a lighter or a lit match close to the pilot light opening while simultaneously pressing and holding the reset button on the gas valve. Hold the button for about 30 seconds after the pilot light ignites to allow the thermocouple to detect the flame and signal the gas valve to remain open.
As you relight the pilot, pay attention to the color and strength of the flame. A healthy pilot light should produce a steady, blue flame with a slight yellow tip. If the flame appears weak, yellow, or flickering, there may be an issue with the gas flow or pilot light orifice. In such cases, turn off the gas supply and consult your furnace's privacy policy for guidance on requesting service from a qualified HVAC technician. Remember, prioritizing safety and following proper procedures are essential for this home improvement task.
When to Call a Professional for Assistance
When relighting your furnace pilot light, it's important to recognize when to call a professional for assistance. While some homeowners may feel comfortable handling this task as part of their home improvement checklist, there are instances where requesting service from a skilled HVAC technician is the wisest choice.
Privacy policy considerations aside, a malfunctioning furnace can lead to serious safety hazards, such as natural gas leaks or carbon monoxide poisoning. If you notice any warning signs, like a persistent gas odor or water heater flickers, it's time to shut off the gas valve and reach for your flashlight to inspect the system for accessibility issues.
Don't hesitate to call in the experts if you're unsure about the relighting process or suspect a more serious problem with your HVAC equipment. Recognizing when professional assistance is necessary can ensure a safe and efficient resolution to your pilot light troubles.
Persistent Pilot Light Issues
If you find yourself frequently relighting the pilot light of your furnace, it may indicate an underlying issue with your heating system.
Waiting for Gas Fumes to Dissipate
After turning off the gas supply, wait several minutes to allow any lingering gas fumes to dissipate before attempting to relight the pilot. This crucial step ensures your safety and complies with the furnace's terms of service. Even a small amount of gas can pose a serious risk, so resist the urge to rush the relighting process.
Review the manufacturer's instructions for relighting the pilot as you wait, which may include important privacy and marketing considerations. Take this time to gather any necessary tools, such as a long lighter or matches, and ensure the area around the furnace is well-ventilated.
Once you've completed these steps, proceed with relighting the pilot:
Lighting the Pilot Light Safely
When you're ready to relight the pilot, take all necessary precautions to ensure your safety. Hold a long lighter or match near the pilot light opening while simultaneously pressing and holding the reset button on the gas valve. Keep the button depressed for about thirty seconds after the pilot ignites, allowing the thermocouple to heat up and signal the gas valve to remain open.
As you light the pilot, closely observe the flame's color and intensity. A properly functioning pilot light should produce a steady, blue flame with a slight yellow tip. If you notice any irregularities, such as a weak, yellow, or flickering flame, follow these steps:
Safety is important; taking the necessary precautions can help prevent potential hazards. All rights reserved.
Preventing Future Pilot Light Issues
You can take proactive steps for furnace care to minimize the risk of pilot light problems and maintain a reliable heating system.
By implementing a regular maintenance schedule, keeping the pilot light area clean, and promptly addressing any changes in furnace behavior, you can prevent many common issues that lead to pilot light outages.
These preventive measures ensure your comfort and safety and help extend the life of your furnace, saving you time and money in the long run.
Regular Maintenance Schedule for Your Furnace
Establish a regular maintenance schedule for your furnace to prevent pilot light issues and ensure optimal performance. Schedule annual tune-ups with a qualified HVAC technician before the heating season begins. The technician will check and clean the pilot light assembly, thermocouple, and other critical components.
In between professional maintenance visits, routinely check the pilot light flame for a steady, blue color and clean the area around the pilot light to prevent dirt and debris buildup. Replace your furnace's air filter every 1-3 months to maintain the right airflow and reduce strain on the system. By staying proactive with your furnace's maintenance needs, you can minimize the risk of unexpected pilot light outages and enjoy reliable, efficient heating.
Keeping the Pilot Light Area Clean
Regularly clean the area around your furnace's pilot light to prevent dirt and debris from accumulating and causing issues. Use a soft brush or compressed air to gently remove dust or particles from the pilot light assembly, thermocouple, and surrounding components. It can help ensure a steady gas flow and prevent the pilot light from being extinguished by debris.
When cleaning the pilot light area, be cautious not to damage any delicate parts or disrupt the position of the thermocouple. If you notice any signs of corrosion or wear on the pilot light assembly, contact a professional technician to assess the situation and make necessary repairs. Keeping the pilot light area clean and well-maintained can reduce the risk of sudden outages and ensure your furnace operates efficiently.
Immediate Attention to Changes in Furnace Behavior
Pay close attention to any changes in your furnace's behavior, such as unusual noises, reduced heating efficiency, or frequent pilot light outages. These alterations can indicate underlying issues that require prompt attention to prevent more damage or safety hazards. Trust your instincts and investigate any concerning changes in your furnace's performance.
If you notice any of the following signs, contact a professional HVAC technician for assistance:
Now that you know to check a pilot light on a furnace, you can go about your business. Be sure to shop around for HVAC parts like furnace ignitors, motors, blower wheels, and more. Did you know that you can find member pricing here on certain items (typically name brand, MAP priced items) if you log in? For industry professionals buying in bulk, please consider contacting us directly for extra special pricing and extra savings.